Mechanical Keyboard Maintenance: Extend Lifespan by 2 Years With Simple Steps
Maintaining a mechanical keyboard through regular cleaning and care can significantly extend its lifespan, potentially adding two or more years to its operational use by preventing premature wear and component failure, ensuring optimal performance and tactile feedback.
A mechanical keyboard is an investment, prized by users for its superior tactile feedback, durability, and customization options. However, like any precision instrument, it requires diligent care to maintain its peak performance and longevity. Embracing effective Mechanical Keyboard Maintenance: Extend Lifespan by 2 Years with These Simple Steps is not merely about preserving aesthetics; it is about safeguarding your investment and ensuring a consistently satisfying typing experience.
Advertisements
the importance of regular cleaning and its impact on longevity
Regular cleaning is the cornerstone of effective mechanical keyboard maintenance. Far from being a mere aesthetic endeavor, routine cleaning directly impacts the operational lifespan and performance of your device. Dust, crumbs, pet hair, and skin oils inevitably accumulate between and under keycaps, within the switches, and on the PCB (Printed Circuit Board). This accumulation isn’t just unsightly; it can significantly degrade performance and even lead to premature failure.
understanding the threats: what accumulates and why it matters
The microscopic debris that finds its way into your keyboard acts as an abrasive, wearing down switch components. Over time, this can lead to inconsistent key presses, sticky keys, or even complete switch failure. Liquids, even small spills, can corrode internal components if not addressed quickly. Dust, especially when combined with moisture (from humid environments or residual liquid), can create conductive pathways that short-circuit the sensitive electronics of the PCB. Neglecting these seemingly minor issues can transform a durable keyboard into an unreliable, frustrating tool. A comprehensive cleaning routine prevents these threats from escalating into costly repairs or replacements, offering an immediate and tangible return on the effort invested.
- Dust and Debris: Accumulates under keycaps and around switches, impeding switch travel and potentially causing gritty feedback.
- Food Particles: Can become lodged in switches, leading to sticky or unresponsive keys.
- Skin Oils and Grime: Build up on keycap surfaces, discoloring them and providing a sticky residue.
- Pet Hair: Especially problematic, as it can get wrapped around switch stems or interfere with sensor mechanisms.
the long-term benefits: performance and lifespan extension
By preventing the build-up of contaminants, you preserve the structural integrity and smooth operation of each individual switch. This ensures that the tactile feel remains consistent across all keys and that every keystroke registers accurately. A clean keyboard also reduces the risk of accidental short circuits caused by conductive debris, protecting the underlying electronics. Anecdotal evidence and expert consensus suggest that a well-maintained mechanical keyboard can easily outlast a neglected one by several years, often doubling its expected lifespan. This longevity translates into significant cost savings over time, as you avoid the need for frequent replacements. More importantly, it sustains the premium typing experience that initially led you to choose a mechanical keyboard, making your daily interactions with your computer more enjoyable and productive.
Regular cleaning is not an optional chore but an essential practice for anyone serious about getting the most out of their mechanical keyboard. It safeguards the intricate mechanisms, preserves the key feel, and crucially, extends the operational life of a device designed for endurance.
essential tools for effective mechanical keyboard maintenance
Having the right tools is paramount for efficient and safe mechanical keyboard maintenance. Attempting to clean or service your keyboard with improvised tools can lead to damage, from scratched keycaps to broken switch stems. Investing in a few specialized items will make the process smoother, more effective, and crucially, safer for your valuable equipment. Each tool serves a specific purpose, contributing to a thorough and gentle cleaning process.
keycap puller: a delicate but firm grip
A keycap puller is perhaps the most indispensable tool for mechanical keyboard maintenance. Its design allows you to safely remove keycaps without scratching them or damaging the switch stem underneath. There are two primary types: the plastic ring puller and the wire puller. While the plastic ring puller is often included with keyboards and gets the job done, the wire puller is generally preferred by enthusiasts. It applies pressure more evenly, reducing the risk of bending or scratching the keycap sides, and is less likely to accidentally pull up the switch stem along with the keycap. Proper use involves gently rocking the puller side-to-side as you lift to ease the cap off its mount.
brushes: sweeping away the dust
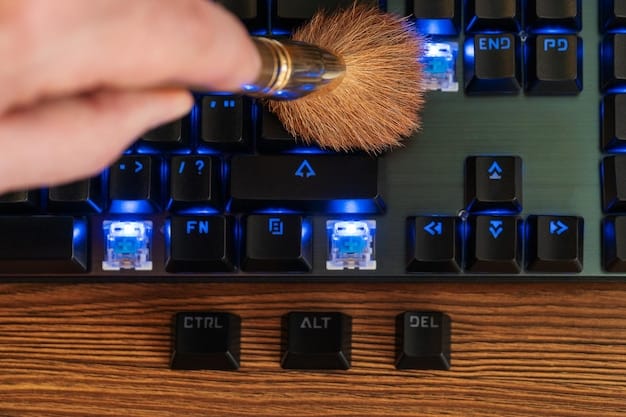
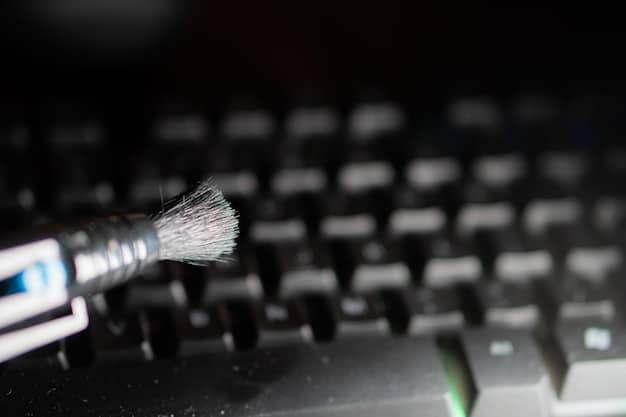
A variety of brushes will prove invaluable. A soft-bristle brush, such as a makeup brush or a dedicated keyboard cleaning brush, is perfect for sweeping away loose dust and debris from the surface and between keycaps. For deeper cleaning once keycaps are removed, a stiffer, anti-static brush can dislodge more stubborn particles from around the switch stems and plate. Using an anti-static brush is important to minimize the risk of static discharge damaging sensitive electronic components. These brushes are effective for reaching into tight crevices and dislodging trapped grime.
compressed air: the power of the blast
Compressed air is excellent for blowing out dust, crumbs, and other loose particles from hard-to-reach areas, especially after keycaps have been removed. When using compressed air, always hold the can upright to prevent propellant from spraying onto components, which can leave residue or even cause damage. Use short, controlled bursts, and aim the nozzle away from your face. It’s also advisable to use compressed air in a well-ventilated area. This tool provides a quick and efficient way to remove surface-level contaminants without physically touching the sensitive parts.
microfiber cloths and cleaning solutions: gentle polish and disinfection
Microfiber cloths are essential for cleaning both the keycaps and the keyboard chassis. They are lint-free and highly effective at trapping dust and oils without scratching surfaces. For cleaning keycaps, a mild solution of warm water and dish soap works wonders. For the keyboard body, a lint-free cloth lightly dampened with isopropyl alcohol (70% concentration is generally safe and evaporates quickly) can be used to disinfect and remove grime without leaving streaks. Always avoid spraying cleaning solutions directly onto the keyboard; instead, dampen the cloth first. This prevents liquid from seeping into internal components.
These tools, when used correctly, form a comprehensive arsenal for maintaining your mechanical keyboard. They enable a thorough cleaning process that protects hardware while ensuring the keyboard remains responsive and aesthetically pleasing for years to come.
step-by-step guide to deep cleaning your mechanical keyboard
A deep clean goes beyond the superficial wipe-down and addresses the accumulated grime that can impair performance and shorten your keyboard’s life. This process, while requiring a bit of time and patience, is crucial for restoring your keyboard to its prime condition. By meticulously following these steps, you’ll ensure every component is properly addressed, contributing significantly to the longevity of your device.
step 1: preparation and essential precautions
Before you begin, it’s vital to disconnect your keyboard from the computer. This prevents accidental key presses and, more importantly, eliminates any risk of electrical shorting during the cleaning process. Choose a clean, well-lit workspace, and spread a towel or mat to help keep track of keycaps and parts, and to protect your work surface. If your keyboard has a complex or non-standard keycap layout (e.g., specific gaming keyboards or those with unique fn rows), consider taking a photo of the layout before removing keycaps. This will serve as a visual guide for reassembly, preventing frustration later. Gathering all your tools upfront will also streamline the process—keycap puller, brushes, compressed air, cleaning solution, and microfiber cloths.
step 2: keycap removal and cleaning
This is where the keycap puller becomes essential. Gently but firmly pull off each keycap. As you remove them, place them in a container. Once all keycaps are off, prepare a solution of warm water and a small amount of mild dish soap in a bowl. Place the keycaps into the soapy water and let them soak for about 15-30 minutes. This helps to loosen grime and oils. While they are soaking, you can use a soft brush to gently scrub any particularly dirty keycaps. After soaking, rinse them thoroughly under cool running water to remove all soap residue. It’s crucial to ensure they are completely dry before reattaching them to the keyboard. Air drying them on a clean towel for several hours, or even overnight, is recommended. Some users opt for an old salad spinner to expedite drying, using centrifugal force to remove excess water before air drying.
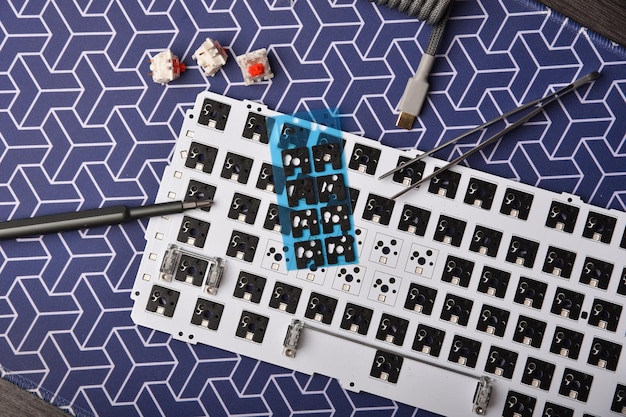
step 3: cleaning the keyboard plate and switches
With the keycaps removed, the keyboard’s plate and switches are exposed. This is where most of the accumulated dust and debris will be visible. Begin by using compressed air to blast out loose particles. Hold the can upright and use short, controlled bursts. Pay particular attention to the areas around the switch stems and between the switches. Next, use an anti-static brush to dislodge any stubbornly clinging dirt or crumbs. For persistent grime on the plate, a microfiber cloth lightly dampened with isopropyl alcohol (70% concentration) can be used to wipe the surface. Be careful not to let any liquid drip into the switches or onto the PCB. The goal here is to remove visible debris and surface grime, ensuring the switch mechanisms remain unobstructed. Do not attempt to pour or spray liquids directly onto the exposed switches.
step 4: cleaning the keyboard housing and cable
After attending to the keycaps, switches, and plate, turn your attention to the keyboard’s exterior housing and cable. Use a fresh microfiber cloth, slightly dampened with isopropyl alcohol or a gentle all-purpose cleaner, to wipe down all surfaces of the housing. This includes the top frame, bottom case, and any side panels. Pay attention to corners and crevices where dust might accumulate. For the cable, wipe it down from end to end to remove any dirt or stickiness. If your keyboard has a detachable cable, you can clean both the cable and the port ends with a cotton swab lightly dipped in isopropyl alcohol. Ensure all surfaces are dry before proceeding. A clean housing not only looks better but also prevents the transfer of grime back to your clean keycaps.
step 5: reassembly and final checks
Once all components are thoroughly dry, you can begin reassembly. Refer to the photo you took earlier (if applicable) to ensure keycaps are placed in their correct positions. Gently press each keycap onto its respective switch stem until it clicks securely into place. Avoid excessive force, as this can damage the switch stem. After all keycaps are reattached, connect your keyboard to your computer and perform a quick test. Open a text editor and type on every key, ensuring that each one registers correctly and feels consistent. Check for any sticky keys or inconsistent actuation. This final check confirms that your deep cleaning was successful and that your keyboard is ready for extended use, now performing as good as new.
routine maintenance: quick tips for everyday care
While deep cleaning is essential periodically, daily and weekly routine maintenance is equally important for preventing excessive build-up and preserving your keyboard’s optimal state. These quick, easy steps can be integrated into your regular computer usage habits, ensuring your mechanical keyboard remains in top condition without requiring extensive time or effort. Consistent attention to these details can significantly prolong the period between deep cleans.
daily habits: small actions, big impact
Incorporating simple cleaning habits into your daily routine can make a considerable difference in overall keyboard hygiene. Before and after each use, a quick wipe-down can prevent the accumulation of oils and dust. Use a small, soft brush, such as a dedicated keyboard brush or a clean makeup brush, to sweep away any loose crumbs or dust from between the keycaps. This only takes a minute but effectively removes surface debris before it has a chance to settle deeper into the keyboard. Additionally, try to avoid eating or drinking directly over your keyboard. If you must, exercise extreme caution. These tiny efforts prevent minor issues from becoming major problems, keeping your keyboard cleaner for longer.
weekly check-ups: a little more detail
Once a week, take a few extra minutes for a slightly more thorough check-up. Use compressed air to blow out any dust trapped beneath the keycaps. Hold the can upright and use short bursts. This helps to dislodge particles that have settled a bit deeper during typical use. Following this, take a microfiber cloth lightly dampened with water or a mild cleaning solution (like diluted isopropyl alcohol) and wipe down all the keycaps. This removes finger oils and superficial grime that accumulate from continuous use. Pay attention to heavily used keys like the spacebar, enter, and shift keys. This weekly routine effectively addresses the ongoing accumulation of everyday dirt, extending the time needed between more intensive deep cleaning sessions.
environmental considerations: where you use your keyboard matters
The environment in which you use your mechanical keyboard plays a significant role in how quickly it accumulates dirt. If possible, avoid using your keyboard in areas with high dust, pet hair, or food particles. Keeping your desk clear and regularly dusting your workspace will reduce the amount of debris that can fall into your keyboard. For those with pets, consider investing in a keyboard cover when not in use. These covers provide a physical barrier against dust, dander, and accidental spills, offering an additional layer of protection. A conscious effort to maintain a clean surrounding environment supplements your routine keyboard maintenance, contributing to its longevity.
By consistently applying these routine maintenance tips, you create a protective barrier against premature wear and tear. These practices minimize performance degradation, maintain the keyboard’s aesthetic appeal, and ultimately ensure that your mechanical companion continues to deliver a premium typing experience for many years beyond its expected lifespan.
troubleshooting common mechanical keyboard issues
Even with diligent maintenance, mechanical keyboards can occasionally encounter issues. Understanding how to troubleshoot these common problems can save you time and money, often allowing you to resolve them without professional help or costly replacements. Many issues are directly linked to cleanliness or simple component wear, making maintenance an active part of the solution.
sticky keys: diagnosing and resolving
Sticky keys are a common frustration for mechanical keyboard users. This problem usually stems from two main culprits: liquid spills or accumulation of grime within the switch housing. If a liquid spill is recent, immediately unplug the keyboard. Remove the affected keycap and, if possible, gently dab away the liquid with a cotton swab or lint-free cloth. For dried spills or excessive grime, a precision application of isopropyl alcohol (99% concentration preferred for its rapid evaporation) using a cotton swab to the affected switch can help. Actuate the switch repeatedly to work in the alcohol and break down the residue. Allow ample time for the alcohol to evaporate before reassembling. In some cases, a particularly stubborn sticky switch might require desoldering and replacement, but often a thorough cleaning is sufficient.
inconsistent actuation: when keys don’t respond
Inconsistent actuation, where a key sometimes registers and sometimes doesn’t, can be a symptom of dust or debris interfering with the switch’s contact points. Begin by thorough cleaning, following the steps outlined for deep cleaning the keyboard plate and switches. Pay extra attention to the specific problematic switch. If cleaning doesn’t resolve the issue, the switch itself might be failing. Mechanical switches have a finite lifespan, and heavy use can cause them to wear out. While individual switch replacement is possible (requiring desoldering and soldering), for non-hot-swappable keyboards, it’s a more advanced repair. For hot-swappable keyboards, swapping out the faulty switch with a new one is a straightforward fix. Before considering switch replacement, always ensure the problem isn’t due to software conflicts or driver issues by testing the keyboard on another computer.
rattling stabilizers: quieting the noise
Stabilizers are crucial components, particularly under larger keys like the spacebar, shift, and enter, ensuring key presses are even and wobble-free. When stabilizers become noisy or rattling, it’s usually due to a lack of lubrication or loose components. The common fix involves lubricating the stabilizer wires and housings. After carefully removing the keycap, apply a small amount of Krytox 205g0 (or a similar specialized lubricant for mechanical keyboards) to the wire and the points where it connects to the stabilizer housing. Use a small brush or a syringe for precision. Be careful not to over-lubricate, as too much can attract dust. If the rattling persists, check if the stabilizer is securely seated on the plate. Some stabilizers are plate-mounted and can sometimes pop out of their clips. Ensure they are fully clipped in place. Proper lubrication significantly improves the tactile feel and acoustic profile of your keyboard.
Addressing these common issues through a systematic approach of cleaning, minor repairs, and targeted lubrication can significantly extend your mechanical keyboard’s useful life. Many problems that seem severe can often be resolved with simple, direct interventions, emphasizing the value of understanding your device.
lubrication and modification: enhancing performance and lifespan
Beyond routine cleaning, targeted lubrication and thoughtful modification can significantly enhance your mechanical keyboard’s performance, acoustics, and lifespan. These processes, while more involved, provide a noticeable upgrade in typing experience and can further extend the life of your switches and stabilizers, pushing your keyboard’s durability beyond factory standards.
the benefits of switch lubrication
Switch lubrication is perhaps the most impactful modification for enhancing a mechanical keyboard’s feel and sound. Lubrication reduces friction between the moving parts within a switch (the stem and the housing), resulting in a smoother key press, reduced scratchiness, and often a more pleasing sound profile – less “ping” and more “thock.” This reduced friction also lessens wear and tear on the plastic components, theoretically extending the lifespan of the switches themselves.
Applying lubricant requires precision. After carefully disassembling switches (which often requires desoldering on non-hot-swappable boards), a thin, even coat of specialized lubricant like Krytox 205g0 for linear switches or Tribosys 3204 for tactile switches is applied to the stem, spring, and housing rails. The goal is to apply just enough lubricant to reduce friction without making the switch feel sluggish or attracting excessive dust. This meticulous process transforms the typing experience, offering a buttery smooth and consistent feel across all keys.
stabilizer modification and lubrication
Stabilizers, particularly on larger keys like the spacebar, are notorious for rattling and a “mushy” feel. Modifying and lubricating stabilizers dramatically improves the sound and feel of these keys. The “holy grail” of stabilizer modification involves several steps: clipping the stabilizer feet (removing small protrusions that cause an inconsistent bottom-out), lubing the wires with a thicker lubricant like dielectric grease or Krytox 205g0, and lubing the inside of the stabilizer housing. Some enthusiasts also perform the “band-aid” mod, placing small pieces of fabric or adhesive medical tape under the stabilizer housing on the PCB to cushion the impact and further dampen sound. These modifications ensure that large keys feel as smooth and quiet as the smaller keys, eliminating frustrating rattles and inconsistencies.
hot-swappable PCBs: the ultimate in flexibility and longevity
For enthusiasts looking for maximum flexibility and longevity, a hot-swappable PCB is a game-changer. Unlike traditional PCBs where switches are soldered directly, hot-swappable boards feature sockets that allow switches to be easily plugged in and pulled out without soldering. This offers numerous advantages:
- Easy Switch Replacement: If a switch fails, you can simply pull it out and replace it, extending the overall keyboard lifespan.
- Customization: Experiment with different switch types (linear, tactile, clicky) across different keys or change them entirely at any time.
- Maintenance Made Easy: Deep cleaning or lubricating switches becomes significantly easier as they can be removed individually.
While hot-swappable PCBs might be a higher upfront investment, the long-term benefits in terms of ease of maintenance, repairability, and customization options easily justify the cost for anyone serious about their mechanical keyboard, greatly contributing to its extended usability and enjoyment. These advanced techniques provide a path to not just maintain, but actively improve, the core performance characteristics of your mechanical keyboard.
| Key Maintenance Aspect | Brief Description |
|---|---|
| 🧹 Routine Cleaning | Regular dusting and wiping to prevent accumulation of dust, crumbs, and oils. |
| 🛠️ Deep Cleaning Tools | Keycap puller, brushes, compressed air, and microfiber cloths are essential. |
| 💧 Lubrication Benefits | Improves switch smoothness, reduces noise, and minimizes wear on internal components. |
| 🔄 Hot-Swappable Advantage | Allows easy switch replacement and customization without soldering, enhancing longevity. |
frequently asked questions
▼
For most users, a deep clean every 3 to 6 months is generally sufficient. If you use your keyboard heavily, eat near it, or live in a dusty environment, you might consider doing it more frequently, perhaps every 2-3 months. Consistent routine maintenance can extend the intervals between deep cleans.
▼
No, it is not recommended to wash keycaps in a washing machine. The high temperatures and detergents can damage the plastic or fade legends. Stick to hand washing them in warm water with a mild dish soap, ensuring they are thoroughly rinsed and air-dried completely before reattaching them.
▼
To clean ABS keycaps without making them shiny, use a mild solution of warm water and dish soap, gently rubbing with your fingers or a soft cloth. Avoid abrasive cleaners or harsh chemicals, as these can accelerate the “shining” effect (wear from friction). Regular cleaning reduces oil buildup, which contributes to the shine.
▼
While not strictly necessary for basic functionality, lubricating mechanical keyboard switches is highly recommended for an enhanced typing experience. It reduces friction, eliminates scratchiness, improves sound profile, and can extend switch lifespan by minimizing wear. It’s an upgrade often overlooked by casual users but cherished by enthusiasts.
▼
To prevent dust accumulation, regularly sweep or blow out debris with a brush or compressed air. Use a keyboard cover when not in use, especially in dusty environments. Keep your workspace clean and avoid eating or drinking directly over your keyboard. Consistent, small actions make a big difference.
conclusion
Meticulous mechanical keyboard maintenance is far more than a chore; it’s a strategic investment in the longevity and sustained performance of a key piece of your computing setup. By adhering to a regimen of regular cleaning, judicious deep cleaning, and targeted enhancements like lubrication, you not only preserve the tactile integrity and aesthetic appeal of your keyboard but actively contribute to extending its operational lifespan by two years or more. This commitment ensures that your mechanical keyboard remains a reliable, responsive, and ultimately more satisfying tool for years to come, affirming its value well beyond initial purchase.


